Every kitchen pantry has the potential to be a well-organized space that works for you.
While Instagram-worthy pantries often set the standard, the most effective organization is one that suits your lifestyle and daily needs.
After all, the goal is to create a space that not only looks good but actually works for you.
By organizing your pantry the right way, you can save valuable time during meal prep and grocery shopping.
Knowing where everything is located helps reduce waste, prevents those annoying moments of scrambling for ingredients, and makes cooking feel a lot less stressful.
One of my favorite tricks is grouping similar items together and considering how often I use each one.
Start With A Purge

A successful pantry organization starts with a purge. This means removing expired, spoiled, or unnecessary items.
Begin by clearing out everything from your pantry. This gives you a clear view of what you have. You can then decide what is essential and what should go.
Steps for Purging:
- Empty the Pantry: Take everything out and place it on a clean surface.
- Check Expiration Dates: Look for expired items and throw them away.
- Identify Duplicates: If you have multiple cans of the same item, keep only what you need.
- Assess Food Quality: Discard any goods that are spoiled or damaged.
This process not only creates space but also helps you avoid buying items you don’t need. By knowing what you have, you can plan better for future grocery trips.
Clean Your Pantry Space
Start by emptying your pantry. Take everything out and check for expired items or those you no longer use.
Next, clean your shelves thoroughly. Use a mixture of warm water and mild soap to wipe down surfaces. This removes crumbs and dirt, creating a fresh space for your items.
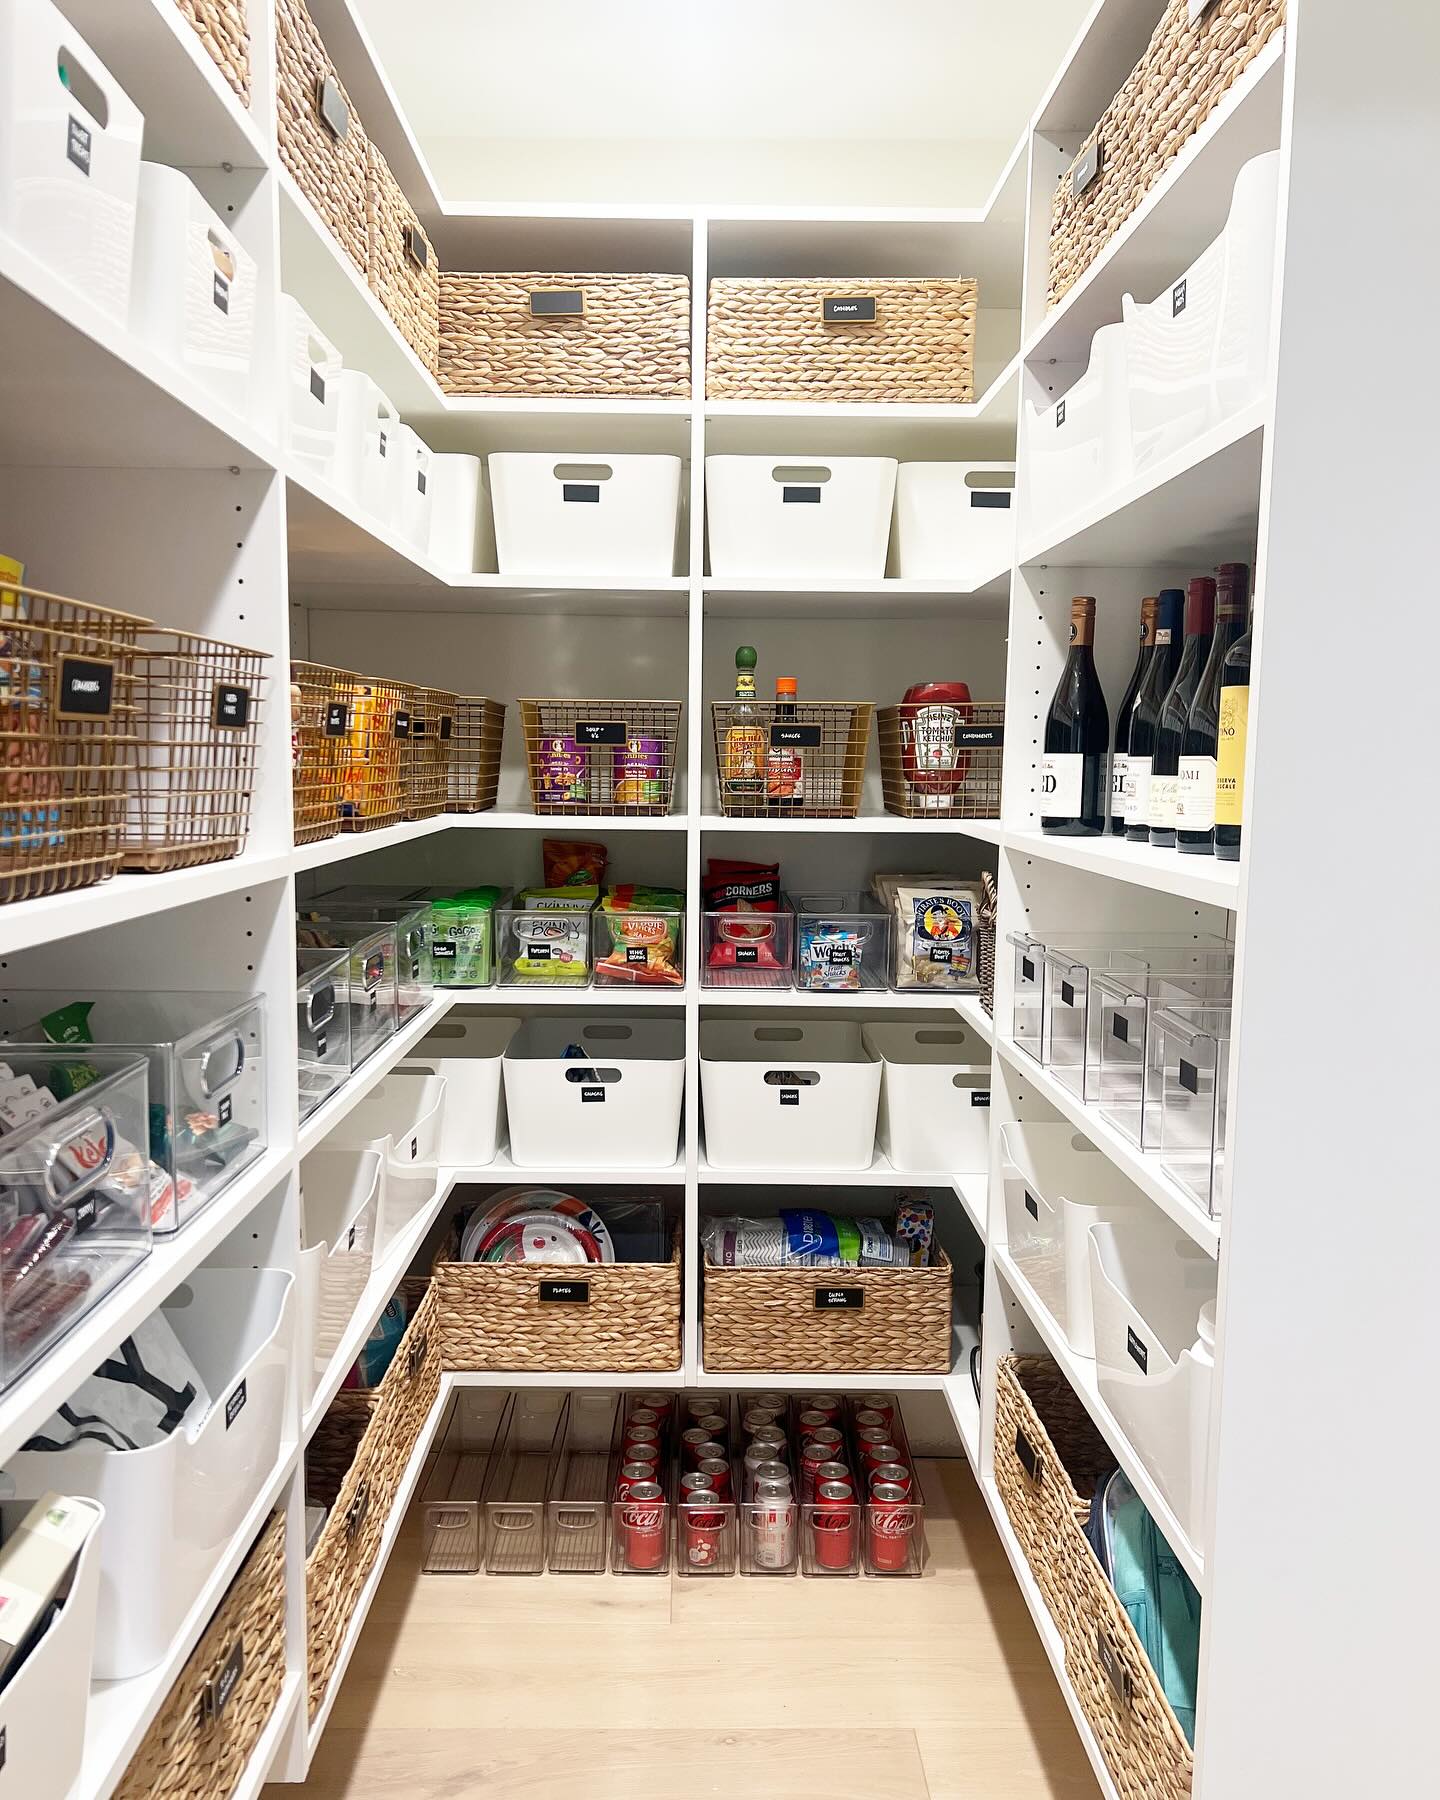
When you have a hidden pantry or awkward spaces, make the most of them. Use baskets or bins to store smaller items. This keeps them contained and easy to find.
After cleaning, reorganize your pantry by placing items back in familiar locations. This is especially helpful for family members with special needs, as it promotes easy access. Consider grouping similar items together—like snacks, canned goods, and spices.
Tip: Use clear containers to store frequently used items. This not only enhances visibility but also helps to reduce clutter. Label each container to avoid confusion.
Organize Using Zones

Creating zones in your pantry helps you find items easily and keeps everything tidy. Here’s how to set it up effectively:
- Identify Zones: Start by deciding on zones for different categories. Common zones include:
- Baking supplies
- Canned goods
- Spices
- Grains
- Breakfast foods
- Group Like Items Together: Placing similar items in the same zone improves organization. For example, keep your baking supplies like flour and sugar close together.
- Use a Spice Rack: A dedicated spice rack keeps your spices organized and accessible. This way, you can quickly grab what you need while cooking.
- Incorporate Lazy Susans: Use lazy susans to maximize space and reach. They are perfect for storing oils, sauces, or spices. Just spin to find what you want!
- Label Your Zones: Label shelves or bins to remind everyone where things belong. This keeps the pantry organized and makes it easy to find items during meal prep.
Use Practical Storage Containers And Tools

Clear containers allow you to see what you have at a glance. This helps keep track of your food inventory and reduces waste.
Consider using uniform containers for a cohesive look. Containers that stack easily maximize space. Choose options like glass jars or Mason jars for dry goods. They are durable and keep food fresh.
Wicker baskets are great for grouping similar items. Use them for snacks or frequently used ingredients. This keeps everything tidy and easily accessible.
Invest in practical tools, such as a Lazy Susan for spices. This device makes items easy to reach without digging through the back of the pantry. A well-placed spice rack can also enhance organization.
Label containers clearly for easy identification. Use transparent labeling to indicate contents and their expiration dates. This saves time when searching for ingredients.
Maximize Floor Space
Using the floor space in your pantry can greatly improve organization. This often-overlooked area can hold items that are bulky or seldom used.
1. Use Risers
Store heavier items like cans and dog food on risers. This keeps them off the floor while maximizing space.
2. Bins and Baskets
Incorporate baskets or bins to keep the floor organized. These containers can hold snacks, baking supplies, or kitchen tools.
3. Small Appliances
If space allows, store small appliances on the floor. This keeps them accessible without crowding your countertops. Popular items include mixers or food processors.
4. Rolling Carts
A rolling cart adds extra prep space and storage. You can use it for ingredients you need often or for extra workspace. When you finish, simply roll it back into the pantry.
5. Vertical Storage
Consider stacking items vertically. Use tiered organizers to take advantage of your floor space. This method allows you to see everything quickly.
Prioritize Functionality Over Aesthetics

When organizing your pantry, focus on functionality rather than just looks. A beautiful pantry can be inviting, but if it’s hard to navigate, it defeats the purpose.
Visual clutter can steal your time. If items are hidden behind pretty baskets or fancy bins, you might struggle to find what you need. For example, I once used decorative jars for snacks that looked great but made it hard to see what was inside. This led to buying duplicates and wasting space.
Instead, choose storage solutions that simplify your cooking and meal prep. Clear containers are often a smart choice. They allow you to see what you have at a glance, cutting down on frustration.
Here are a few tips to keep functionality at the forefront:
- Use labeled containers: This helps you find items quickly.
- Adjust shelves: Make sure they accommodate both tall and short items.
- Keep frequently used items at eye level: This prevents hunting through everything.
Storage For Non-Daily Items

When organizing your pantry, it’s important to find a place for non-daily items. These are things you don’t use regularly, like paper goods and extra supplies.
Placement:
- Store these items at the bottom or top of your pantry. This keeps them out of the way and makes room for everyday items at eye level.
Containers:
- Use larger, solid containers to hold paper goods like napkins and towels.
- Consider clear bins for easy visibility. Label them so you can quickly find what you need.
Grouping:
- Keep similar items together. This makes it easier to locate things when you need them. For instance, group all canned goods, backstock snacks, or bulk items in one area.
Inventory:
- Periodically check these non-daily items. This helps you know what you have and prevents over-buying.
Use Wall Space And Extra Shelving

To make the most of your pantry, utilize wall space effectively. Installing shelves or racks allows you to organize smaller items like spices, snacks, and condiments.
Acrylic shelves or adjustable door racks can add extra space.
Shelf risers are another great tool. They create additional levels for items, enabling you to stack cans or jars without wasting space.
A plate rack can help organize your pantry. Use it to store plates, which frees up counter or shelf space for other items. It can also add some style to your pantry’s look.
Don’t forget about pull-out shelves. These make accessing deeper items much easier. You can simply pull them out instead of reaching into the back of the shelf.
Behind-the-door storage is an excellent way to use otherwise wasted space. You can add pocket organizers for smaller items.
Additionally, consider over-the-door organizers. They are perfect for holding spices, packets, or bags.
Add Labels For Easy Identification
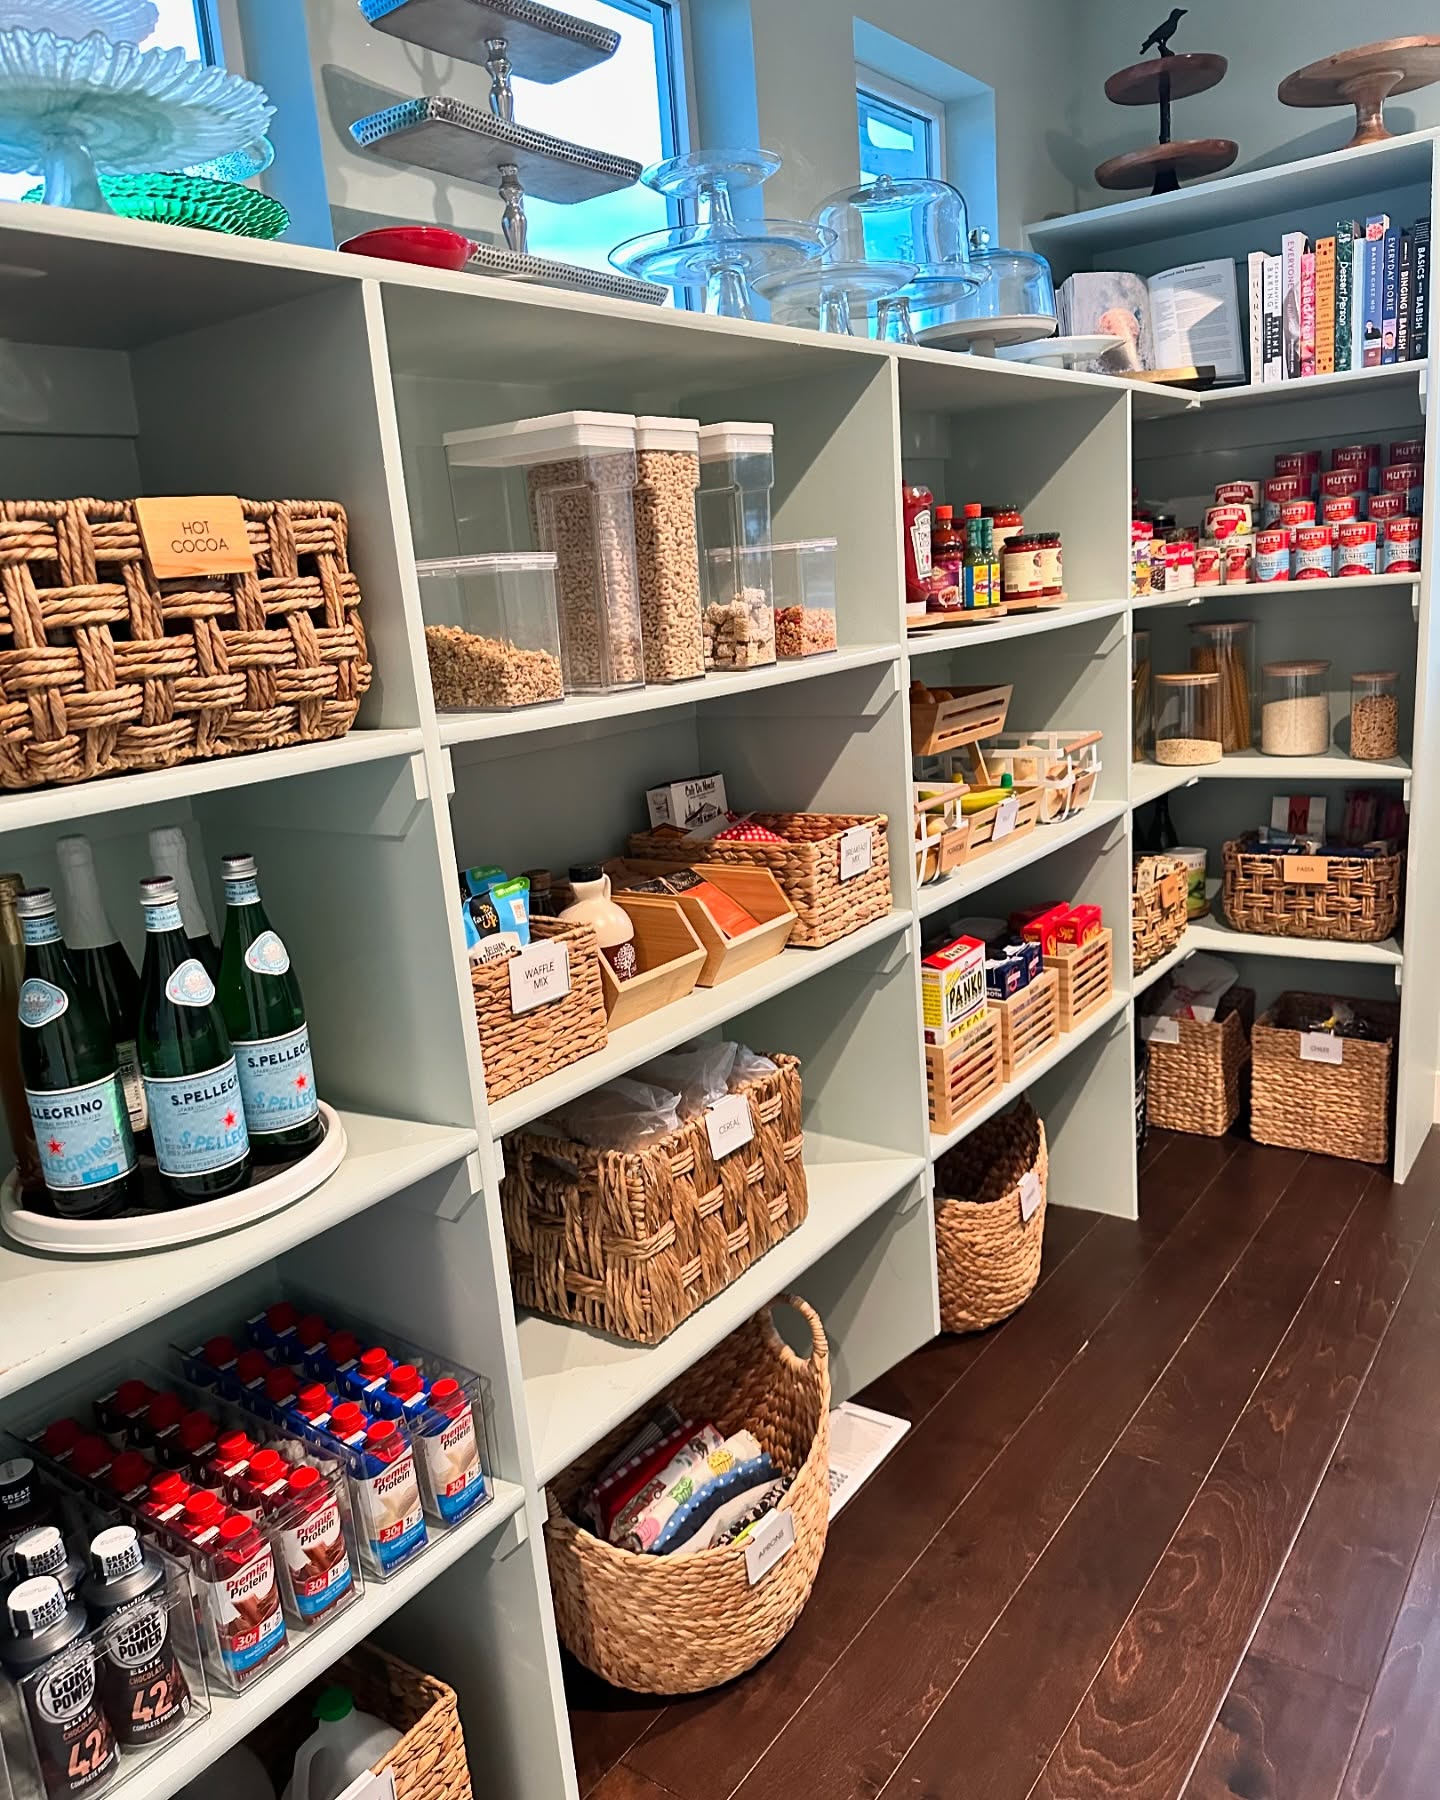
Labeling your pantry items makes it easier for you to find what you need. This is especially helpful when using bins or clear containers.
Choose the Right Labeling Method
- For clear containers, consider using vinyl labels. They stick well and provide a clean look.
- For bins, you can use metal labels or simple options like washi tape for a decorative touch.
Keep Track of Expiration Dates
Always label expiration dates on your food items. This helps you monitor freshness and minimize waste. You can write the date directly on the label or use a separate sticker.
Organize by Categories
Labeling by category makes accessing items faster. For example, use “Canned Goods,” “Snacks,” or “Baking Supplies.” This way, you know exactly where to look when you need something.
Get Creative
You can personalize your labels. Use colorful markers or different fonts to make them visually appealing. This adds a fun touch to your pantry while remaining functional.
Final Thoughts
A functional pantry doesn’t need to look perfect. It should meet your daily needs and make cooking easier. Focus on what works best for you.
Feel free to adapt these strategies to your own style. Organization is about finding what makes your life simpler and more efficient.
Your pantry can be a space that reflects your habits and preferences. Share your own tips or transformations in the comments or on social media. Your experience might inspire others on their journey to a better pantry!
Pantry Organization Tips